Git
Est. read time: 8 minutes | Last updated: April 09, 2024 by John Gentile
Contents
Getting Started
Git is a very popular, lightweight and powerful tool for source control. Git is most likely installed already on your Linux system, however if you need information on how to install Git, why Git works the way it does or would like to read up on the background of Git, see Getting Started - About Version Control and other chapters in the Pro Git online book. If you are already familiar with Git or other source control systems though, you can keep reading to get up and running as fast as possible.
Git Applications
While Git is mainly used via command-line (complete command set and IMHO quicker/more efficient to use once you’re used to it), there are many other apps/plugins to interface with Git and Git servers. For those who prefer GUIs, Git comes with gitk (a graphical history viewer) and git-gui. As well, for Mac and Windows users, Github provides a very slick app for free that works for both Github repos as well as any other remote/local Git repo you can work with. For more info on other tools, see Git in Other Environments.
As well, if you are developing an application that you would like to leverage Git functionality, you can use libgit2 or JGit to use Git operations.
There are also web frontends for Git repositories such as cgit.
-
BFG Repo-Cleaner: Removes large or troublesome blobs like
git-filter-branchdoes but faster and written in Scala. -
git-imerge: incremental merge and rebase for git
Commands & Workflow
Clone or Start Tracking a Git Project
git init: Used to start tracking existing files or a new project. Creates.gitsubdirectory in current directorygit clone [path to repo] [target directory]: creates directory at[target directory, initializes a.gitdirectory in it, pulls down data from repo and checks out a working copy of the latest version.- The repo path can be a variety of path types and protocols; it can be a local system path, a
http://path,git://protocol or SSH- For SSH Repo access, use
git clone user@server:path/to/repo.gitto point to the intended Git repo
- For SSH Repo access, use
- If cloning from a remote repo to a local repo,
cloneautomatically sets your current branch (and branch-name) tomaster, sets the remote-name toorigin, and sets your master branch to track the remote branch - See also
git checkoutin the Branching section below.
- The repo path can be a variety of path types and protocols; it can be a local system path, a
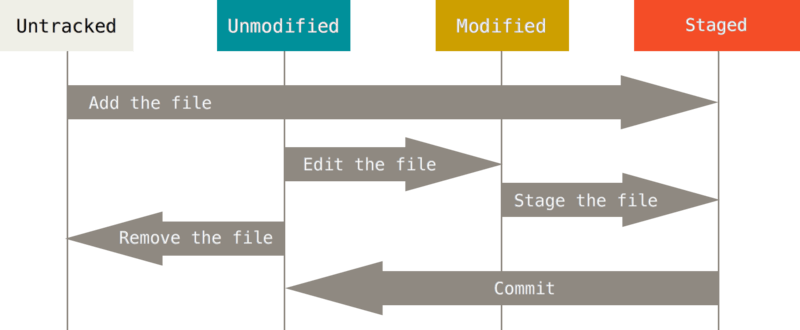
Making Changes to Your Repo
Tip: A lot of changes/commands can utilize regular expressions to target multiple files.
git status: Shows the current status of your local Git repo and any changes to the files being tracked.-soption to show simplified output.
git add [file(s)]: Add current file(s) to repo and start tracking its changes. Also used to stage modified files to next commit.git add -Ato recursively add all files in your working directory (and directories below)
git rm [file(s)]: Remove file from repo and stop tracking-fto force removal of file from repo if it has already been committed the file before.
git mv old_file new_file: Similar in operation tomvshell command, but useful if moving or renaming a tracked file (or else Git will think you removed a file and added a new one).git commit: Commit staged files and add a message describing changes.-m "message about changes"to insert a quick message.-voption to insert diff output into commit message-ato automatically stage and commit all files that were already being tracked before the commit (useful to skipgit addcall).--amendto change commit message or quickly stage some files for intended commit.
git log: Shows history of repo in reverse chronological order (most recent->oldest)-pShow the patch introduced with each commit.--statShow statistics for files modified in each commit.--shortstatDisplay only the changed/insertions/deletions line from the –stat command.--name-onlyShow the list of files modified after the commit information.--name-statusShow the list of files affected with added/modified/deleted information as well.--abbrev-commitShow only the first few characters of the SHA-1 checksum instead of all 40.--relative-dateDisplay the date in a relative format (for example, “2 weeks ago”) instead of using the full date format.--graphDisplay an ASCII graph of the branch and merge history beside the log output.--prettyShow commits in an alternate format. Options include oneline, short, full, fuller, and format (where you specify your own format)
git reset: Unstages staged files.
Tags
Tags are useful for tracking revision/release history. Git has 2 types of tags: lightweight (just point to a specific commit) and annotated that are stored as full objects and include tagging information as well as other commit info.
git tag: list available tags-l "v1.8"searches for and lists all tags related to a particular pattern (in this case for v1.8)show v1.8shows tag data and other information related to a specific tag (in this case v1.8)-a v1.8 -m "this is a tag message"create an annotated tag (v1.8 in this example) and attach message in quotes- A lightweight tag can be created by simply ommitting all other command parameters except the desired tag (i.e.
git tag v1.8) -a v1.8 9fcec04is useful for tagging a past commit (that has a checksum starting with9fcec04) with tag v1.8
- A lightweight tag can be created by simply ommitting all other command parameters except the desired tag (i.e.
Working with Remote Git Projects
git remote: perform actions on remote repos-vshow URLs that Git stored for reading/writing to a remoteadd [alias] [URL]adds a remote server and uses a shortname[alias]to use for commands (useful for adding, for example, a known SSH Git server’s repo location)show [remote-name]shows branch/push information for a certain remoterename [remote-name] [new remote-name]renames a remote’s shortnamerm [remote-name]Removes a remote
git fetch [remote-name]: goes out to remote repo and pulls all files. Therefore,git fetch origingets any new work that has been pushed to the server since you last cloned/fetched but does not merge them with your changes.git pull: automatically fetches and merges any changes from remote branch to your current branch (if your current branch is setup to track a remote branch); essentially the same asgit fetchfollowed bygit mergehowever its sometimes better to use fetch and mergegit push: pushes local branches to remote repo. However, you need write priviliges to the remote and if someone has already commited changes before you, you must fetch and incorporate their work before yours.[remote-name] [branch-name]pushes commits from local branch[branch-name]to server[remote-name]repo (i.e.git push origin masterpushes commits inmasterbranch to remote serverorigin).[remote-name] [branch-name]:[new branch-name]pushes local[branch-name]to remote branch[new branch-name][remote-name] --delete [branch-name]deletes selected branch from the server
[remote-name] --tagspushes all tags to remote server that are not already there[remote-name] v1.8pushes a specific tag (v1.8 in this case) to the server
Example: Adding Existing Repo to Server via SSH
First we clone just the necessary repo files (no working directory) to a seperate .git directory:
$ git clone --bare /path/to/project_dir/ /path/to/project.git
Or you can just copy the entire .git/ directory in your project to another location, or just use that .git/ directory if its on a server already.
If you’re not on the server, you can push the bare repo to a server, using the scp command:
$ scp -r project.git user@git_server:/path/to/server/project.git
From here, its a matter of regular system administration to make sure that:
1) All members of your dev team have user accounts that are able to SSH onto your Git server and,
2) Any user needing to contribute to that project has write permissions for that directory so they can push changes.
3) The process for a remote user can now be as simple as clone, commit and push
You can also use tools like GitWeb to run an HTTP GUI for your server based repo.
Branching
Branching is the process of diverging development and commits away from the main branch (default branch is master). It is recommended to branch and merge often in Git as it is very lightweight and useful. A popular workflow is to have a master branch for fully-working releases, a dev branch and shorter running topic branches for experimental ideas or features:
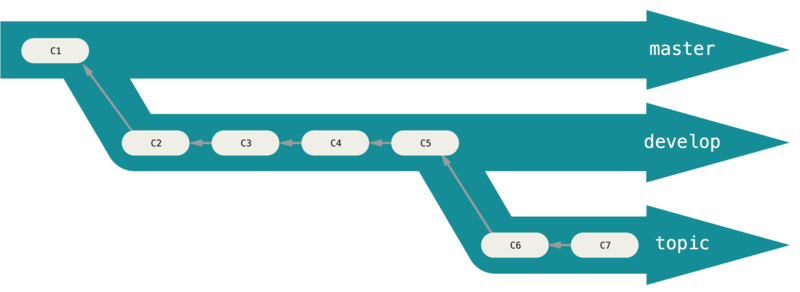
It’s also important to note that switching branches changes the files in your working directory.
git log --oneline --decorate --graph --all: nicely shows history of commits, branch pointers and where branches divergedgit branch: shows currently available branches[branch-name]: creates a new branch named[branch-name]pointed to the current commit the HEAD pointer is currently on-d [branch-name]deletes branchbranch-name-vvalso shows last commit on each branch and what each branch is tracking and if your local branch is ahead, behind or both (rungit fetch --allbeforehand to get up-to-date info)--no-mergedshows any branches that contain work you haven’t merged and--mergedshows any branches that you have merged into the current branch-u origin/branchset current branch to remote upstream branch
git checkout [branch-name]: switches current branch to[branch-name]. You should, ideally, have your current working directory in a clean state (changes committed and up-to-date) before switching branches.git checkout -b [branch-name]creates and automatically switches to branchbranch-namegit checkout -b [branch-name] origin/branchcreates and automatically switches to branchbranch-name, and gives local branch that starts (and tracks) from remote branchorigin/branchgit checkout --track origin/branchis synonomous with the above if the ranches are to have the same name
-- [file(s)]: Useful if you’re looking to revert a changed file back to what it looked like at last commit/clone.
git merge [branch-name]: mergebranch-namewith your current working branch (note: this means you need to switch/checkoutto the branch you wish to merge withbranch-namebefore callingmerge)- If there is conflicts in a merge (i.e. same file with different changes in branches to be merged) Git will stop merging until you fix the issue.
git statuswill show the problem files and you can either manually fix the conflict, add the file back and commit or use a tool likegit mergetool git rebaseis also a very powerful tool and explained in better detail here
- If there is conflicts in a merge (i.e. same file with different changes in branches to be merged) Git will stop merging until you fix the issue.
Git Commit Messages
After adding the necessary files/modifications ($ git add), we run $ git commit to open up an editor to make a commit message- note if all relevant files are already being tracked, we can skip $ git add and run $ git commit -a to add all modified files to the commit.
To have well formed Git commit messages you should follow some basic guidelines:
- A brief, but descriptive as possible and in imperative form, subject line that summarizes the change and the subsystem. Limit to around 50-70 characters max. This also helps when checking the terse history of commits in a repo such as
$ git log --pretty=oneline. - Blank line between subject and body message.
- Body paragraph(s) that completely explains the current behavior, why that’s undesirable, how this change commit fixes/addresses the issue and why the solution is desirable. If the commit needs to address another past commit, include that commit’s short SHA-1 identifier.
- Use
$ git commit -sto sign-off the commit message with your name and email you setup when configuring Git on your system. - Set your text width of all lines to be at 72 characters at maximum (e.x. in Vim
:set tw=72though this should automatically happen in recent versions of Vim). There are reasons to do this but mainly to be a good citizen when writing commits that can be easily read on a variety of systems.
See more about detailed patches and messaging in the Linux Kernel documentation on submitting-patches.
Useful Tools
git diff: is a basic diff tool for showing changes on tracked files you haven’t staged yet. Use the--stagedoption to compare your staged changes to your last commit.- Improve Git Monorepo Performance with a file system monitor
Configuration & Customization
.gitconfig
Similar to other Unix programs, Git uses config files to store preferences and options for a user’s Git environment. Git uses and prioritizes information in the configuration files, if present, in this order:
- Local config for a certain repo (located in the Git directory at
.git/config) - User config (located in user’s home directory at
~/.gitconfig) - System config (located at
/etc/gitconfig)
Aliases can be used to use shorthand commands to represent longer or more complex commands (i.e. the below config file would map git last as the same command as git log -l HEAD). As well, certain variables can be changed and set; a more complete listing and background can be found here. Here is an example .gitconfig for a user:
[user]
    name = Your Name
    email = your_email@domain.com
[core]
    editor = vim
[alias]
    co = checkout
    br = branch
    ci = commit
    st = status
    unstage = reset HEAD --
    last = log -l HEAD
.gitignore
Used to tell Git to not automatically add/track certain files. This is useful for files that come up during builds you do not wish to include in your repo (like log files or intermediate files). You can use regular expressions to specifiy certain groups of files as well. GitHub has a very comprehensive list of .gitignore files you can use or start from.
.gitattributes
When dealing with cross-platform development teams (e.g. devs with both Windows & Unix editors), non-standard line endings can often occur. To mitigate this, simply use a .gitattributes file with the following contents:
* text=auto
Bash/Shell Completion
Git also has a script to allow autocompletion of its entire command set (in the same fashion as traditional Tab command line completion). Simply put the git-completion.bash script somewhere and add a reference to it somewhere in your .bashrc script:
. /path/to/git-completion.bash
Once your shell is reloaded, doing something like $ git chec and hitting Tab will autocomplete to $ git checkout
There is also added scripts in contrib/completion/ in the Git source code to enable similar functionality in other shells as well as adding information about the current directory’s Git repo to the shell prompt.
Git Hooks
https://git-scm.com/book/en/v2/Customizing-Git-Git-Hooks
References & Tutorials
- Pro Git, 2nd Edition- Scott Chacon and Ben Straub: indispensable, free reference book on everything Git.
- try.github.io: 15 minute interactive web tutorial to learn & practice Git.
- Learn Git Branching: game/tutorial on learning both beginner, and more challenging, Git procedures.
- Oh shit, git!: examples on how to fix common Git mistakes and problems in plain English.
Maintained by John Gentile • Found a problem on this site? File an Issue
This work is licensed under a Creative Commons Attribution 4.0 International License.![]()